
Most dehumidifier leaks are fixable at home. Unplug the unit first, then check the tank, drain hose, drain plug, and whether the unit sits level, because those four spots account for the overwhelming majority of leaks. Cracked condensate pans and failed pumps happen too, but they’re rarer and usually show other symptoms first, like ice on the coils or a pump that runs without discharging water.
TL;DR:
- Most leaks are caused by improper tank seating, a worn drain washer, or uneven flooring, which can typically be fixed without replacing parts.
- Inspect the tank for cracks by filling it with water and checking for damp spots on a towel, then reseat or replace it as needed.
- Check the drain hose and connector for a missing or perished washer, and clear any algae or mineral buildup to prevent clogs.
- Ice on coils during operation indicates that melting overflowed the condensate pan, often requiring defrosting and monitoring for recurring icing.
- When internal parts like a cracked pan or tubing are the cause, repair costs can exceed the price of a new unit, making replacement more cost-effective.
Table of Contents
- Quick 5-step checklist to find a dehumidifier water leak
- Repair or replace: making the cost-sensible call
- Safety checks and maintenance to stop leaks coming back
- Author notes on dehumidifier leaks and where to get parts
- What most homeowners get wrong about leaking dehumidifiers
- Replacing parts or the whole unit with ClimatePro
- Sources
Quick 5-step checklist to find a dehumidifier water leak
Run through these steps in order before you touch anything internal. Most leaks reveal themselves within the first two or three checks.
- Unplug the dehumidifier and move it to a flat, level surface.
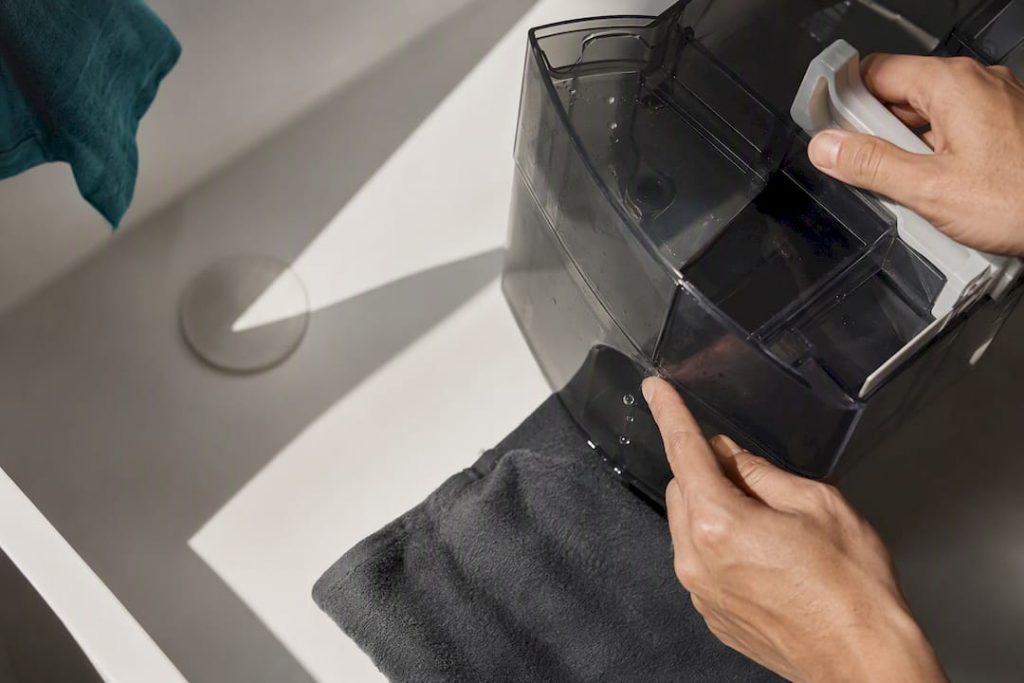
- Remove the water tank and fill it in the sink to check for cracks or a poor seal.
- Check the drain plug and, if fitted, the continuous drain hose for kinks, clogs, or a missing washer.
- Inspect the base of the unit for a cracked condensate pan or a loose internal tube.
- If your model has a built-in pump, listen for it running and confirm water is actually discharging.
Service data on leaking units backs this order up: more than half of leak call-outs get resolved through cleaning, reseating, or levelling the unit, not through replacing a part.
The tank: cracks, seating, and overflow
Pull the tank fully out and inspect the seams, especially near the handle and the float mechanism, for hairline cracks. Fill it at the sink and let it sit for a few minutes on a dry towel. Any damp patch on the towel means a crack, and the tank needs replacing rather than patching. If the tank is dry but leaks only inside the unit, the problem is usually that it isn’t seated fully. Push it back in until you hear or feel it click into position, and check that the float arm moves freely.
Drain plug and continuous drain hose
If your model uses a continuous drain hose instead of the tank, the fault is almost always at the connector. A worn or missing rubber washer inside the hose fitting is one of the most common causes of leaking at the base of the unit, and it’s a cheap fix. Unscrew the connector, check the washer is present and not perished, and reseat it snugly rather than swapping the whole hose. Also run water through the hose over a drain to check for algae or mineral buildup, which clogs gravity-fed drain lines over months of continuous use and pushes water back up into the unit.
Pro Tip: Keep a spare rubber washer from a garden hose kit in your maintenance drawer. It’s the single most overlooked part in a leaking dehumidifier and takes thirty seconds to swap.

Level and placement
An uneven floor tilts the internal tank away from the drain outlet, so water spills over the lip instead of draining properly. Rest a spirit level on top of the unit, or slide a piece of paper under each corner to feel for a gap. If the floor itself is uneven, shim the low corner with a thin rubber pad rather than propping the whole unit on something unstable.
Condensate pan and coil icing
If you notice ice forming on the coils during operation, that ice melts during the defrost cycle and can overflow a stressed condensate pan. Icing that appears right after the unit cycles off is a strong clue the coils are the issue, not the pan itself. Let the unit sit unplugged for 30 minutes to fully defrost, then dry the pan and run it again in a warmer room to see if icing recurs.
Float switch and condensate pump
Units with a built-in pump should activate automatically once the internal reservoir fills. Listen for the pump motor; if it’s silent, check the pump activates when you manually add water to the reservoir. If it runs but nothing comes out the discharge line, the intake is likely blocked. Clear visible debris first, and only consider the pump failed if it still won’t move water after that.
Seals, chassis, and when to call a technician
Loose side panels or a missing gasket around the tank compartment can let condensation escape before it ever reaches the tank. Reseat panels firmly and check gaskets sit flush. If you’ve ruled out the tank, hose, level, and pump, and water is still pooling, the fault is likely a cracked internal tube or condensate pan, which needs a technician.
Repair or replace: making the cost-sensible call
Cheap fixes, a new washer, a reseated tank, a levelled base, cost next to nothing and solve most leaks. Internal faults are a different story.
- Washer, hose, or gasket replacement: low cost, DIY-friendly.
- Tank replacement: moderate cost, usually available as a standalone part.
- Cracked condensate pan or internal tubing: often requires partial disassembly, and Labour plus parts can be expensive enough that replacing the entire unit may be more cost-effective.
- Failed pump: worth repairing on newer units, often not worth it on older ones.
Check your warranty and any authorised service option before paying for a repair. If the quoted cost runs anywhere near 50 to 60% of what a replacement dehumidifier would cost, buying new is usually the better move.
Safety checks and maintenance to stop leaks coming back
Always unplug the unit before opening any panel, and wait at least 30 minutes if you suspect icing, since coils and internal wiring stay live-adjacent even when the compressor is off.
- Wipe down the tank and check the seal monthly.
- Flush the drain hose with water every few months to prevent algae and mineral buildup.
- Clean or replace the air filter regularly. A clogged filter restricts airflow, which can drive excess condensation and icing on the coils.
- Before seasonal storage, empty the tank fully and run the unit for ten minutes to confirm it drains cleanly.
Pro Tip: A clean filter isn’t just about air quality, it directly affects how much moisture the coils pull, so a dirty filter is one of the sneakier causes behind recurring leaks.
Room size and ventilation matter too. A dehumidifier working in a space larger than its rated capacity runs longer and colder, which increases icing risk. Our guide to the dehumidification process covers how airflow and room size affect performance if you’re unsure your unit is matched to the space.
Author notes on dehumidifier leaks and where to get parts
Diagnosing dehumidifier leaks comes down to three simple tests: fill the tank in a sink to check for cracks, pour water through the drain hose to confirm flow, and run the unit while watching for icing during the defrost cycle. Check your model manual for exact part numbers, and browse ClimatePro’s dehumidifier and parts catalogue for compatible replacements. Continuous drain connections also benefit from routine checks covered in this drain line maintenance guide.

What most homeowners get wrong about leaking dehumidifiers
The mistakes repeat: hoses go unflushed for a year, units sit on uneven tile without anyone noticing, and early ice gets ignored until it’s a puddle. A five-minute monthly check, tank, hose, level, filter, catches nearly everything before it becomes a mess. That small habit beats any repair bill.
— Nevel
Replacing parts or the whole unit with ClimatePro
If your dehumidifier’s tank or drain hose is cracked beyond a quick fix, replacing the part is almost always cheaper and faster than paying for a full repair callout. The store stocks dehumidifiers and genuine replacement parts, with delivery across multiple locations in the UAE, so you’re not stuck waiting on a single local supplier.

Before ordering, check your model number against the listing to confirm the tank, hose, or filter you need actually fits your unit. If you’re not sure which part matches your model, or whether your unit is due for a full replacement rather than a repair, get in touch with support from the supplier for help identifying the right fix. Browse the available dehumidifier range to compare replacement units and parts, and sort out the leak for good.